Sunday, July 31, 2011

The Ruffles Sun Dress Tutorail

 I hope everyone had a wonderful weekend! It was nice sunny and hot here, a great weekend! Now onto our tutorial.
You will need
two fabrics, about a 1/2 yard to 1 yard each . (less for a smaller girl more for an older.)
Elastic thread
thread
Now lets get started!
 1, This dress requires no pattern at all just simple cuts so it is pretty easy to make.
For the top of the dress measure you child and x that by 2. so Sweet pea's 20"x by 2 + 40. Since she was so close to 22 I just cut the intire width of the fabric. For little ones you need just one big cut but for older you'll need 2 pieces of fabric. (if your measurements is 25" you'll need two 25" cuts). or the lenght I measured a long Tshirt of hers. you won't want this part to long.***note if you are not using a serger add 1" to the lenght for narrow hemming.***

For the two rows of ruffles cut them 4"x double the width of the top piece you just cut out. Cut out both colors. ****note if you aren't using a serger add 1" for hems so instead of 4" make it 5"***

Cut out a width of the fabric x4" for straps.
 2, Serge or narrow hem both top and bottom of fabric. Sew the seam(s) together using a 3/8" seam allowance. For the narrow hem fold over and press 1'4" and then fold over again a 1/4" then stitch in place.
 Take your long 4" strips, the main color first and sew the strips together to make one long piece of fabric. Now take the second color and do the same.
Now place the two long strips of fabric you sewn together and place them right sides together and pin. Sew them with a 3/8" seam allowance. Press the seam towards the top9main fabric)  and then edge stitch the seam down.


 3; Now take the two short ends, pin together with right sides facing and stitch. Finish edges and press the seam.
 4; Now serge or narrow hem the top and the bottom of this piece.
Now make a gathering stitch across the top of the ruffle fabric, about 3/8" seam.
 5; Working on right sides of fabrics, over lap the ruffle fabric 1" over the main top piece. Gather evenly across pinning in place. Stitch over the gathering stitch so attach ruffle. (see next two pictures)

 6; Now mew 8 rows of shirring starting a 1/4" from the top and make them a 1?4" apart. Here is great tutorial on shirring.
 7; take the strap fabric and fold it in half, pinning in place. Sew with a 1/2" seam allowance, turn and press. Then edge stitch both sides.
 Now place the dress onto your little girl and measure the straps lenght and placement marking both. Take and finish the edges of the straps and then pin and sew in place. We are all done, enjoy!
Happy Sewing!
Sharon


Friday, July 29, 2011

The Sun Ruffle Dress

Lately I haven't put any tutorials up for you ladies or for my little Sweet pea but today I got a wind of inspiration for a beautiful sun inspired ruffle dress perfect for twirly for my newly dancing daughter!

 The top of the dress is shirred with serger finished edges, I have been wanting to make her a shirred top dress for some time now. It is made out of light weight cotton fabric so it is nice and cool on hot days and comfy with the shirring too! I will be posting the tutorial for this dress on Monday morning!!
 Can you tell where this is leading to??
Yep, too many photos Mama. Well not the best photos but it was the end of a long day. Maybe she'll sleep really well for us tonight. :)

Happy Sewing and have a blessed weekend!

Sharon

Thursday, July 28, 2011

An Upcycle!

I had these two shirt sitting in closet and made them into a shirt and this dress for Sweet pea. She loves them but she really doesn't wear alot of knits.... until now! I use the Oliver + S  hopscotch pattern. It sews up very quickly and easy, about an hour for the dress. Can you tell I am addicted to these patterns lately?!?
 Sweet pea thought it was the perfect couch jumping dress so pardon the photos seeing she wouldn't sit still.
Happy Sewing!!
Sharon

Tuesday, July 26, 2011

All night Sewing Party at My House!!!

Yes, Sweet pea can hardly hold her excitement about this! I sat at my new sewing machine yesterday evening and got to know my new friend. I made Sweet pea this Hopscotch top first, which after I tried it on her she wouldn't give back, lol.
 And then the skirt to go with the top, I can't believe how nice my new machine sews. It makes sewing addictive, not that it wasn't already. ;) I also finished up the strips in Sweet pea's room yesterday morning. I thought I would never finish! 
 Say cheese!!
 The top is all knit, yes that's right! I was so excited to sew a top from a pattern and it turned out! The skirt has a working button placket down the center front and cute pockets that were inspired by Chinese take out boxes.
And a new bubble dress with the scallops. I love this fun print, it loos like bubble floating off in the summer breeze.

 and yes there is even more!! New curtains or Sweet pea's room makeover. I used fabric from Hobby Lobby, marked down to $7 a yard. I really love this print. Now all her rooms need is new carpet and a new home made bumper pad. whhew, I am tired!!
Happy Sewing Ladies!!

Sharon

Saturday, July 23, 2011

Let's Go Explore!

 I was able to finally finish my boys' explorer vest tonight!! I used the pattern from the Little Things to Sew book. I don't know who is happier, them or me. My good old sewing machine started to have a number of problems and after weighing the cost of getting it fix and buying a new machine we decided to spring for a new one. (only $50 more for the new) This is that part that makes me happy!! :)
 They loved the pockets that were on the front and the back of the vest, lots of room for neat treasures they can find.
 This fellow found a pretty neat moth, it is pink and white. We haven't seen one of these before and he thought it was the coolest thing. Of course he found it because of his explorer vest. ;) or so he thought.

I hope every one's weekend is going well!
Sharon

Going, Going....

This week of sewing hasn't been so much, sadly my sewing machine hasn't been working well. I think it's the timing and the bobbin case is bad on it. My machine is a Brother and is almost 15 years old so I think it is starting to brake down. My machine's bobbin stitching is skipping and I have broke 4 needles on my project i am sewing, which has been over a week of sewing! So not like me. I have stopped a thousand times readjusting it trying to get it work. 
  After a week of almost no sewing I have found I have two options. Option 1, get mine serviced and fixed, about $100 at the moment if they don't find anything else wrong. It is also a hour drive from the house and would take a week. Option 2, buy a new cheaper model which would be $200. So I am weighing the options. Any thoughts or advice ladies would be greatly appreciated!

Sharon
Wednesday, July 20, 2011

A Flower Shelf Tutorial

 Good afternoon ladies! I hope everyone day is going well. I made Sweet a new shelf for her room redo. Well, the shelf isn't new but sure does look like it now! It was a pail purple color before. All I had to do was paint it the same color as her new picture frames for her room so it would match. So this was another free project!
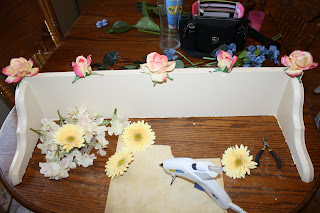
 To make this simple pretty shelf all you need is of course a shelf and some flowers. I bought mine a while ago from Hobby Lobby so I didn't have go out and buy any, and a lovely assentant.
First pull all the flowers of the stems and figure out where you want all your flowers to goJust place hot glue on the back of the flowers and place them onto the shelf, it's that easy! I put one type of flower on at a time then added the rest from there.
 First the roses then the daises went on flat. (Sweet pea was enjoyong some fish crackers here, lol, so she left me)
 I glued the hydrandes onto the top back of the daises, that way they layed flat.
 Here is a better look at the back of the daises (or the top of the shelf).
 Add in some rose leaves to finish & Tada!!
 A quick new shelf to and some beauty to any girl's space!
I am almost done with the strips too! I can't wait to show you her finished room.
Sharon

Monday, July 18, 2011

A Sneak Peek

 Good morning! I hope everyone had a wonderful weekend. We had a good one but I am now tired! Sweet pea had learned to climb up everything!! So I spend most of my day chasing after her taking her off her brothers' bed, the kitchen chairs, the kitchen table....On the bright side of things I was able to get some painting done. :) It is going to take a bit to finish the whole room though seeing I am trying to paint at night while the kiddos are asleep.
 Some fabric, can you guess what it will be?? (Love htis print!!)
 Another wall picture, I mad it the same way as the paper dolls. Sorry about the bad picture of it though the flsh of the camera shines off the finish so it is hard to get a good pic. The color ids off in the topo picture but right in the bottom.
I will be working on a few more projects for this toddler's room this before the room reveal. I will tell you ladies that it hasn't cost me one dime so far!! That is a price my hubby loves. :)


Happy Sewing!!

Sharon

Friday, July 15, 2011

Paper Doll Wall Art Tutrial

 I am starting to redo Sweet pea's room this week, the first thing on  the list was a wall art of the Oliver + S paper doll and dresses from the pattern sleeves. All the Oliver + S patterns have these so cute paper dolls on the front of them! I wasn't about to cut the sleeve up but I did make a copy of them and cut the copies up. (sorry but my camra wouldn't take a non blury pic)
 The cute picture frame started out like this, hard to believe?  First I primed nad then painted it to give a new life.
 Much better now!! :)
 I then Mod podge scrap book paper to center of the frame, you can't see it but the paper has a fabric look to it so I wanted to leave it "crinckled" to make it look more like old fabric. I copied the patterns then cut out my paper doll and clothes. It made me feel like a little girl again! :) A lot of fun!
 I then played around with the placement for a bit until I liked where they were at, and tired on the clothes on the doll too. ;) I don't know why but for some reson the bottom of the paper was more crinkled than the top. I then Mod Podge them in place, that's it!
 For now it is sitting on her bedroom wall but will be coming off for a wall painting. Sadly the bathroom had a leak on shower wall and on one side the dry wall has to be replaced in her room. So I thought while I was at it I might as well make a toddler room up for Sweet pea. The picture above is hte best one, it's the right color as it is in person.
 Another blurry picture but it gives you an idea of what it looks like on her wall. :)
More to come soon!!