Monday, August 31, 2015

Christmas Stockings for the Family


This year I have made my whole family matching stockings for Christmas. Well I really stared these in June and had planned on having them done and posted by July but life got busy! I am sure you know how that goes. 


Now these stockings are not just any stockings but they are from my pattern I made. I am hoping to have it all done this week week and posted up. (I would say for sure I will but life does happen.) The pattern will be completely free and I will post it up on my blog. Sew them up as you would like. Make one for your child, grandma or friend's children. I also ask one thing in return for offering this pattern for free. While you are making one up could you make an extra one and give to a child in this this coming Holiday season? 


Christmas time is a very special time of the year for my family and me. It is first off Jesus 's birthday. The kids of course love the Santa part as well. Santa means home made lovelies on the wall and under the tree to them. 

However, while I was sewing these up I had enough fabric to make two more up, extra ones. I then started thinking how one should have been our lost baby's stocking. It did make me cry....a lot. Then I started thinking how I know he is ok and doing well  in heaven in the arms of Christ and how there are so many children here that do not have a a wonderful Christmas. Sure people do help donate gifts for families struggling but I started to think that these children do not have a nice stocking hung on the wall from Santa. I am sure some do have the the cheaper made store run of the mill stockings but wouldn't it be wonderful for these children to wake up and find a lovely homemade stocking form "Santa" on Christmas morning? This thought made me smile. I know it is something small but it is something that I can do. 

I am planning on organizing with our local charity and fabric store to get our wonderful local quilters and seamstresses together to make as many as we can for this years Christmas. My goal is that all the local children will have have a lovely stocking this holiday season. 


To make 9 stockings I used one Moda JellyRoll, 4 yards backing/top fabric, 6 yards lining fabric and one crib size quilt batting. So be on the look out for the pattern by the end of this week or beginning of next week! 


Sharon 

Friday, August 28, 2015

Lexi-Lou by Vision to Remember Blog Tour


It's not often that I sewn something other than clothes and this purse sure was fun to make! It's a rag quilt style so it sewn up fairly quickly and was a great way to use up some of my most favorite scraps of fabrics. All the fabrics on this bag are scraps I have had on hand saving for something special.  


The purse has two large outside pockets with the "rag quilt" style to them. They are large enough to put in a library book for when we are at the park. Very nice to have! 


The inside has one large pocket on one side and a smaller compartment pocket on the other, great for putting my phone and keys in so they are not lost. The inside is big enough I can put in a change of clothes for the little one and even a snack. It would work out great for a diaper bag even. (Which is really what my purse always looks like anyways, lol)


Be sure to leave a comment on my blog to be entered to win a free pattern. Each blogger on the tour will be choosing one comment from their blog to receive a free pattern from A Vision to remember.
Also, the Lexi-Lou Pattern has been discounted 25% this week! Get yours now on Craftsy or Etsy!

Happy Sewing!!

Sharon 


8/24-  cropped-cbtcover3.jpg
8/25-  B40L-Logo_thumb2
8/26-  better blog picture
8/27-   Blog logoAdventures with Bubba & Bug
8/28- 11800478_422701267916962_2090016111176047274_n &  th_IMG_2526-1-1

Tuesday, August 25, 2015

Funktional Threads Blog Tour, The Grace Dress


I happy to be apart of the pattern company Funktional Threads blog tour today! I sewn the Grace Dress pattern for my little girl, Sweet pea. The dress really is her style, lots of ruffles!! 


The Grace dress has a five different options for where and how many ruffles you would like to add to the dress, we did version D with ruffles on the sides and back. While Sweet pea and I both loves, loves ruffles I will tell you it took longer to sew the ruffles than the rest of the dress. The ruffles really are worth the time too! Sweet pea's favorite part of this dress is the ruffles, second is the bodice.  


The bodice is her second favorite part because of the fussy cutting I did. This is a dress for school so on the bodice it says "Together" so she knows mommy is with her even though I cannot be there. I did modify the bodice in leaving off the sash to make room to see the full bodice. I even fussy cut hearts to go around the waist band as well.   


I also love how I can layer this dress for school this fall winter too. This way she will get more wear out it. 


The dress has a nice full skirt as well, we put Sweet pea's Icing skirt under her's so you can see the fullness of it. A prefect dress for dancing in say's Sweet pea! 


You can find the pattern I sewn up today here for sale. 


Check out Tameka's blog Tomorrow to see what she has sewn up! 

Savannah & Co.


Be sure to check out the other blogs as well!! 


8/24- cbtprofilepic1  8/25-th_IMG_2526-1-1
8/26- 11940498_10155977490645066_33350779_o
8/27- 1
8/28- 1392940_711008842255757_350848984_n


Happy Sewing!!!
'

Sharon 


Saturday, August 22, 2015

Fall Brother and Sister outfits


More back blogging today for you, these outfits I sewn a few weeks back. Our mornings and nights are starting to get chilly and I want to be prepared for fall weather before it arrives to our area. Both Prince C's top Sweet pea's outfit are Art gallery Indelible knit. I love the feel of this brand of knit fabric! It is so sturdy and super soft as well. Prince C has worn his top to bed a few nights already saying it was so warm and comfy. 


Miss Sweet pea's is Tea Collection dress knock off. My first go at this I use the O+S Library dress but I was not super happy with the fit of it. I had just sewn along in a sew along over at Izzy and Ivy with the Tullilah dress (now I love, love that dress pattern!!) and was thinking it would be perfect with less mods needing to be done to the dress. All I did was make the waist band longer and the bodice longer as well, took the cuff off the sleeve added the length back into the long sleeve and added a 1/2" for hemming, (four inches I think?) and added a knit A line skirt. It was really easy to do. I used Oliver and S Playtime leggings pattern for the bottoms. These have to be my favorite legging pattern ever! 


Prince C's outfit I used Oliver and S Sail boat pattern for his shirt. I adore this pattern for boys so much. I prefer the top sewn in all knit though, it looks like it was made for knits to me.  I also love how I can sew one of these up in a few hours from start to finish and the fit is spot on for little man. I also love how this knit top can easily layer over a long sleeve oxford shirt as well. (Wait till you see the his second fall outfit I made him!!!!! Oh yah it's that awesome. ;-)} 


The bottoms are from Oliver and S Sandbox patterns made in a corduroy however though I didn't sew this pair. They came form Oliver and S Sample sale.  (still going on right now too if you would like to buy a few things.) 


Now I will tell you I love the fit of this whole outfit on Prince C but I will not lie that I cried as I traced it out. I had to trace out a 3T, yes a 3T! When did he grow so much!! It seams like the years are flying past.  


I really also love how both children love this fabric, it works so well for both girls and boys. I love the fall colors in it as well. Sweet pea and Prince C love the birds on it most. I knew they would, they are my bird watchers. 


They are growing up fast but they are still best friends. I love these two!  


happy Sewing!!!

Sharon 

Friday, August 21, 2015

Sweet pea and Her First Week At School In Mama Made and Back Blogging Fashion Show Part #1


First off it has been a really good week for all the kids going back to school. They really enjoy it so far. You can tell from Sweet pea's photos that she was super nervous at first but as the week has she has decided she has the most smart teacher in the world. This makes me happy to hear. This was her first Grammies Dolls outfit I had blogged about a while ago and her new teacher! 


This is my less that excited crew on the very first day, Prince C or Caillou as he likes to be called now (He gave himself this nick name and loves it), is super happy until he got to school and did not stay with Sweet Pea. He is doing fine but misses his sister terribly so during the day.  


Day #2 Our Oliver and S Butterfly Blouse and skirt set. I love the fit of set and the length of the skirt and blouse both. The skirt is corduroy and the shirt is Art galley Emma Grace. We plan on layering this outfit in the fall.  (I bought a pair of the cute fox socks that Brittany posted about to go with this now!!!) 


You can tell by her second day that it went much better and she was happy to go back. Yay!! 


Day #3 Grammies Doll's Bitty Beatrix Blouse with store bought jeans.....yes store bought. Any way....the shirt has cotton lace details on the bodice ad the sleeves are trimmed in lace. This top too will be layered in the cooler days coming ahead.   


Notice more happy on day three?!? 


To answer the question, yes she can still play in store bought jeans. She wasn't sure of these strange stiff things but some of the other children had them so we had to try them out. I know she will need them in our freezing winter weather.   


Day #4 and our last day of this week she saved her most special, favorite dress in all her closet. The dress who's fabric came all the way from Australia for a really good friend.   


Today is her Library day at school and she has decided this means dress day at school. This dress was made with Oliver and S Puppet Show Dress trimmed in lace and antic buttons. I love the timeless look of this one. The blue looks so lovely with her green eyes. 


This dress is also great for church as well. It's so lovely I think. When she out grows this one it will be put up in my sewing studio with her smocked Easter dress. 


The back has "flat" buttons so her hair does not get stuck in the buttons. Her long hair seems to do this with regular buttons now, no fun at all. 


I have to say a very  big thank you again to Tamara, I hope one day to tell you in person. :-) 


So week one down and many to go. I will post many more new outfits next week as she wears and get my blog caught all up!  I also will be posting a free Christmas stocking pattern here too for everyone. I sewn our whole family up one this summer. 

happy Sewing!!!


Sharon 

Tuesday, August 18, 2015

Bitty Beatrix Sew Along Day Three

Welcome to our Third and final day of the Bitty Beatrix Sew Along!! Today we will finish sewing this cute blouse up. We will tackle sewing the arm opening, I love this clever way Theresa wrote this pattern for this part! So lets get started!! 


**First before we start be sure to read all directions of the pattern first.**

1. This step is something I do myself and is not in the pattern. I serge the edges of both the front and back bodice lining pieces. Do not rim off any of the pieces, I just finished the edges. 


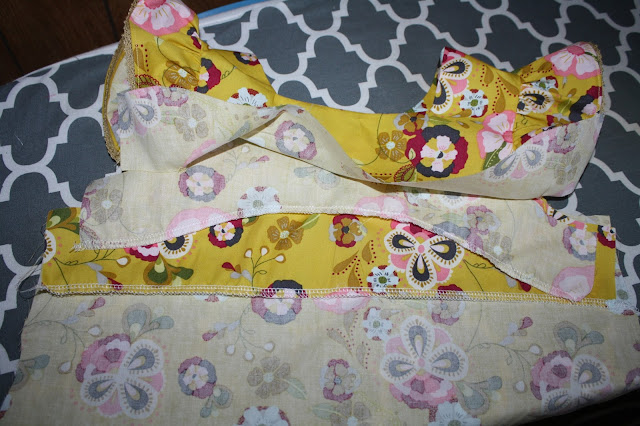
2. Now onto the closing the arm holes. I have lots of pictures for these steps so if you fins it tricky I hope this help. Take the left side of the bodice. Separate the lining part from the main and open up with the right side of the main/lining bodice up. (see picture below)


When you open up the bodice pieces lay the ruffle sleeve facing in towards the center seam. 


3. Now take the right bodice arm opening piece and roll it over to the left side and place it the right side in the center of the left. (Be sure that the right side is rolled up nicely so you are sure not to stitch it)


4. Now take the un-sewn edges of the left side and then place right sides together (with the right side still rolled up in the center) and pin the raw. 


Stitch together. trim sewn edges well them turn right side out. 


Press well then Repeat with second side. 


5. Sew two rows of gathering stitches to the top skirt. Gather the threads to fit the bottom of the front bodice and pin only to the main front bodice. (be sure to pull the lining bodice out of the way. Sew together then press the seam up towards the bodice. 


6. If you are adding lace trim sew it on at this point. I take my lace first and press it in a curve with a steam iron to better shape it into the bodice curve. Then pin onto the front bodice with the bottom of the lace just over the bottom of the top bodice edge. Stitch on both top and bottom edge of the lace in place. (I also leave a bit of the lace over hanging either side on this step.)


7. Take the front and back bodice and pin them together with right sides facing, including the lining bodices. Stitch then finish the raw edge. Repeat with second side. Press side seams and then press the lining bodice into place in the inside of the bodice. 


8. Now the pattern calls for the lining to be press under a 1/4" then hand stitched into place. This is where I did mine different and as why I serge the bottom edges of the bodice linings. 

I smoothed the inside bodice linings into place then pinned the main front bodice to the lining bodice. 

Outside view. 


Inside view. 


Stitch the lining bodice in place by stitching on the right side of the bodice right over the bottom lace stitching line. If you do not have lace stitched onto your bodice then stitch in the ditch of the bodice and skirt seam. 


9. To finish up the back bodice take the wears right side and measure over a 1/2" and bring the edge of the right side over a 1/2" then press. It will leave a pleat in the back of the bodice. 


I just pressed mine very well and did not stitch this in place just because I love the look of the back bodice this way. 


Mark the button holes according to the pattern directions then stitch. Very lastly hem the shirt with a narrow hem. 


That is it, we are all done!!! Oh I also added a lace bow to the center front bodice. 


I hope you had as much fun as I did! Be sure to add your finished photos to the Grammies Dolls Face Book Group


Sharon