Wednesday, September 30, 2015

Free 18" Doll Undies and T-shirt pattern


It's been a while since I have posted any doll clothes on here so today I thought I would share a free pattern with you! This is my 18" doll undies and T-shirt basic pattern. Both top and undies sew up fairly quickly so your daughter's dolly can have lots of extra sets. 


The undies are one piece that finish with fold over elastic. Right now all craft stores has lots of pretty colors and pattern fold over elastic so sky is the limits on this one. The shirt comes in thee sleeve lengths; long, 3/4" and short. You can even leave the top sleeveless as well. 


You can find my free pattern here, 


 If you would like to share the pattern please direct them to this blog post. 

Happy Sewing!! 


Sharon 

Tuesday, September 15, 2015

Autumn Fairy Doll


Meet Faith, an autumn fairy dolly. 


 This little one came "flying" into my sewing room the other day. Sweet pea was thrilled as could be with her when she seen her. (Although she was suppose to be a surprise and Sweet pea found her before she had her wings....)


Let me tell you about little Faith, she is a Dolls and Daydreams patterns. She is my first pattern from there that I have sewn so far. I hand embroidery her sweet face to match that of miss Sweet pea's. I added freckles even and she has her green/hazel eyes too. Her hair, flowers and wings are wool felt and she is stuffed with wool as well. She is such a cuddly doll! 


I made the tulle skirt as per the pattern then also made a over skirt as well to match her dress. The tulle skirt is about 1" longer so that it sticks out the bottom of her dress skirt. The orange tulle "glows" in the sun light too. 


She even has wee little wool shoes. Now sewing this doll was easy for me, turning it was no problem either and stuffing really was a breeze. I was sure I would have problems too with those tiny skinny legs of hers. However putting on those shoes was another story, I had to use a small flat head screw driver as a shoe horn to put those things on this doll. I told Sweet pea to never take those things off! I might just sew them onto her. hehehehe


I did modify the pattern a bit and sewn the hearts onto the wings instead of using separate pattern pieces. I used a metallic bronze thread for this so that it sparkles in the sun light. 


She was my test go but Sweet pea has already made off with her so I guess you could say the test go was a success. ;-) 


I have plans on making a few more of these dolls up this week too. It only took me about two hours for this one and I am sure the next one will be quicker for sure. They really are so much fun to sew. If you would like to you can find the pattern here for miss Faith. 

Happy Sewing!! 


Sharon 

Monday, September 14, 2015

Ruffled Lace Legging Tutorial


I shared with you the other day two different pairs of ruffled lace leggings I made my Sweet pea, she loves them so much and has requested two more pairs. That really makes me feel so good to hear my kids request sewn items! So today I will share with how I made these cute leggings. (Also for me to remember how made these for next year. ;-) } 


 I used the Oliver and S Play Time pattern for the leggings, 100% cotton 2" wide lace, 1/4" elastic and some satin ribbon for the green pair. (The ribbon is option and does not need to be added.) I chose to use use a different colored lace on both pairs as well. The knit fabric I used for both pairs I used the knit fabrics from Whimsical fabrics. I buy all my knit fabric from them right now, I really love the price and fast shipping. 


1. I took my pattern piece and pinned it to my fabric first. Then I found the center of my legging at the bottom pant leg and marked 1" away from the pattern piece with a fabric marker. Next I drew a curved shaped tapering it at both ends to meet the original pattern piece at the bottom sides.   


2. I then hemmed my pants according to the pattern directions but left the side seams un-sewn. 


3. I then folded my legging pant bottom in half to find the center and measured up 4 1/2" and marked it. (My pair is a size 6 for the smaller sizes you might not want to measure up as high.)


4. I then took my lace (Uncut) and placed it down with the wrong side up and placed the elastic on top of this in the center. The elastic should be even with the lace on this step. 


5. Then I folded the lace (with the elastic sandwiched in between) down a 1/2". 


6. I then took the center of the lace/elastic and place it right into the marking that I made and pinned the the lace and elastic all the way down to the the bottom hem line. 


7. I sewn across the top, sewing through all the layers of lace and elastic.  


8. I then sewn down each side of the elastic on the lace to form a casing for the elastic. Starting at the top and finish at the hem stitch line.


9. Pull the elastic to "gather" the lace up. On this part i just pulled the elastic until I liked the look. I then pinned the elastic in place, then stitched it down right over the bottom stitch line. 


10. Then I took the elastic and pulled it to stretch it then cut it. The elastic will then "pop" into the lace so the end will not be seen. 


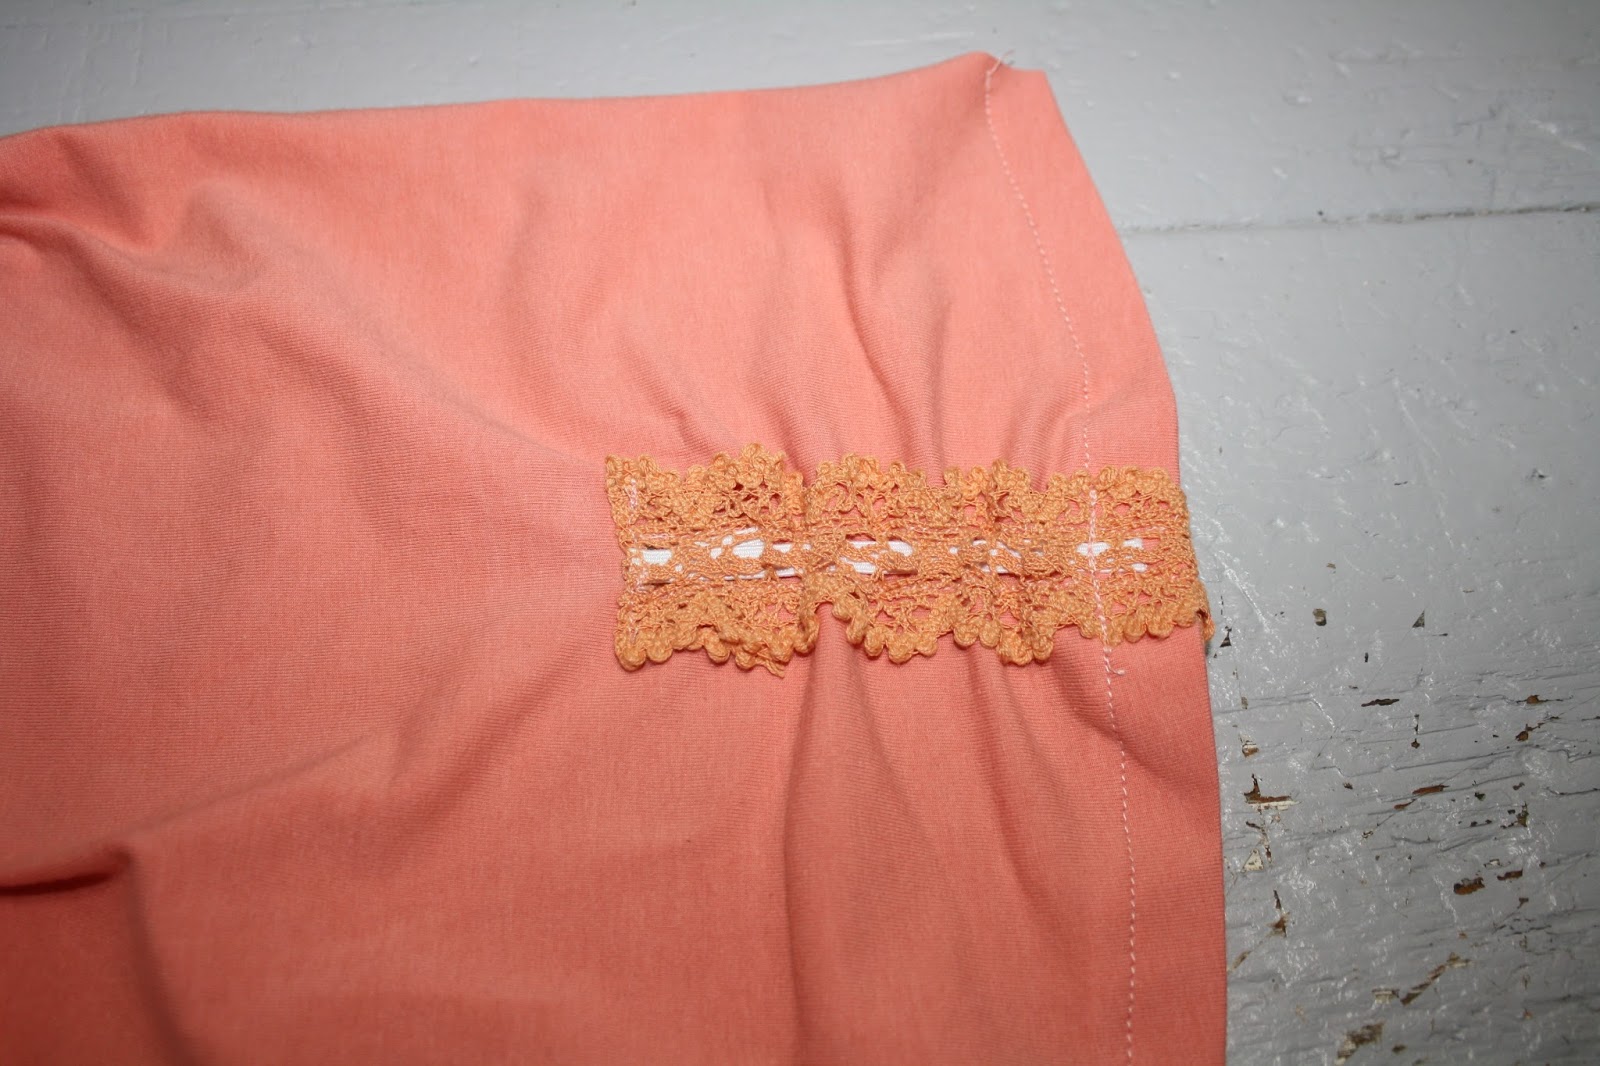
11. Then I cut the lace just a little over 2" long on the end. (I cut mine off at the end of the pattern) 


The fold it over once to meet the bottom of the pant leg. 


Then a second time so that it was above the the hem stitching line, pin in place then flip over to the right side. 


12. Then I stitched right over the hem stitch one again to finish. 


That's it! I added a ribbon to the green pair but did  not on the apricot pair. It looks really cute both ways I think. Either way they are a lot of fun to make! 


Happy Sewing!!

Sharon 

Friday, September 11, 2015

Make It Mine Challenge Round #2!


I am back today with my second Make It Mine Challenge (MIM) look! I had so much fun sewing this second look, just as much fun as the first! Even the two youngest had fun with these outfits as well. (Can you tell with these happy faces?!?) 
(You can find the first post over here


The Make It Mine Challenge is a contest that is from Whimsical Fabrics where you purchase from the the three fabric lines from Art Gallery Anna Elise, Curiusities or Happy Homes and make these fabrics your own! Today I used the Oliver and S Patterns to make my look. For my girl's I used the patterns Carousel dress, Play Time Leggings, Firefly Jacket. For my Son's I had to use my favorite O+S pattern of all times the Tea Party play suit with the Parachute Polo under and then a LTTS Bucket hat. All patterns can be found in the shop here. The bucket hat can be found here free on the Oliver and S site. 


For both of my outfits I used the Curiosities fabric line. LOVE! I know I have said it before but I adore the Art gallery knit so much!! 


For my daughter's I used the O+S Carousel dress, it is my first time sewing one and I am smitten with this pattern already!  I love the lines of this dress, I chose the view with a straight skirt and both Sweet pea and I love it. 


The dress is a raglan style with keyhole/button lope on the back. I have never been big on this lok but I love how this pattern finishes so much! It has a nice clean look that I love. 


I also added Sweet pea's cotton lace to this dress. We found this local and she really love it. I sewn it right over the seam on the dress front. The dress also has the wonderful pockets on the front that are sewn into the seams. 


I sewn the Play Time leggings to go under her dress for the cooler weather. I added the ruched lace to this pair just like the last pair. I will be posting a tutorial on the how-to next week. They are really easy to make. 


For Prince C look I used my all time favorite boy pattern, the Tea Party Play suit. I did fully line mine, like always, but I also added pockets and a growth cuff. I made a all knit Parachute Polo too wear under it.  I even made him a reversible bucket hat! 


I really love these cuffs! I sewn just like that of the Sleepover pj pattern but only not as long. Perfect for a growing boy. 


The back pockets are from the Sandbox pant pattern.(Also O+S) I used the pant pattern for pocket placement. 


I also added self-drafted front pockets, because a boy can never have too many pockets! I tihkn the pockets are the his favorite part of this outfit. 


I made baby piping to place between the yoke and bottom of the play suit and finished it with wooden buttons to make his sister jacket.  


Here is a better look of his polo and second side to his bucket hat. I have only made two polos so far buy I have at least two more I know that I will make, LOVE! The only change to this pattern was to make a all knit version instead of the woven collar and button placket. 


So are you ready to join the MIM Challenge?!? 
Check out the Whimsical Fabrics Blog for all the details and please join our Face Book group too for more fun!! 


Happy Sewing!!!

Sharon 

Wednesday, September 2, 2015

Whimsical Make It Mine Challenge!!


What is the Make It Mine Challenge you ask?? Well it's a contest that you use the fabrics from the Anna  Elise, Curiosities or happy Homes fabrics Art gallery that Whimsical Fabrics carries and make a creation of your choice as far as you can image! You can read all the rules and how to enter on the Whimsical Fabric Blog

Here is my sample entry for the MIM contest! 


First up is my daughter's outfit. I used 51% of the main fabric for my outfit on her dress and used the coordinating fabrics for her leggings and her brother's outfit. The  patterns I used are Oliver and S ; Fairy Tale dress, Apple Picking dress, Roller Skate dress and Play Time leggings all mashed into one! (All the patterns that I used came from Whimsical Fabrics' Shop)  The fabrics for my daughter's are from the Curiosities line  and the Anna Elise line. 


For the main part of my dress I used the Fairy tale dress pattern. I did change the bottom hem to add a hem band with baby piping inserted between the two. (Cord to make the piping can be found here in the shop) I did keep the original length of the dress for this one. Next I used the Apple Picking dress sleeves with the same piping that I used at the hem band. I love the way it makes the sleeve cuffs "pop". 


For the neckline I changed that up as well and used the Roller Skate neckband. I really love the V shape to it and love the yellow band going all the way to the back of the dress. I did have to reshape the pattern piece to fit the fairy Tale dress neck line. I am really happy with the finished result! 


The leggings are the Play Time Leggings pattern. I did change these a bit as well. I traced the Apple Picking sleeves rounded shape onto the bottom of the hem on the leggings to allow room for the rouching. I sewn the pants hem first with the lace and elastic first before the rest of the pants. I am sure I will be making more of these for winter! 


The last part of her outfit? This amazing lovely bow in back of the dress!! 
(The fairy Tale dress will be one of our fall sew along as well!!)


 Up next is my youngest son's outfit! I had just as much fun sewing his as I did my daughter's. I used the fabrics in the Anna Elsie line for his. The patterns are from Oliver and S Sketchbook and Sail Boat. Two of my favorite boy patterns! 


For his Sketchbook shirt I made some mods to it, not many and all were really easy to do. First off I added piping on the collar, both sides of the button placket and on the top of the pocket.


 I also added a collar stand and separate collar piece to this one as well. (This pattern the collar is only a one piece so I made it a two piece). I can see more of these being made for him as well! 


The shorts are straight from the pattern themselves. I did use the same print as his top for the pocket linings though to add some fun for him. He really loves this part!  He is crazy about pockets. The shorts are finished with a brass button to match the shirt. 


Now onto my favorite part of the Sketchbook shirt, the hem! From the shirt's outside you cannot see it but on the inside it is so cool! I made a hem facing, inspired by the Music Box Dress from O+S. I love how the dress has such a fun inside surprise and wanted to make my son's shirt the same way. It was a huge hit with him as well. The shirt is also sewn with french seam for a lovely inside finish. 


 His over shirt is made with the Sail Boat top made in all knit, the Art Gallery Knit is so soft!! I added hand embroidered bronze triangles to match the sketchbook shirt and finished it with wooden buttons. The Sail boat shirt layers lovely over the sketchbook shirt for cold weather too.  
     

This look really suits my little guy so well. Prince C's signature look it really is! 


I hope this post has got your creative juices flowing! There are so many lovely prints to choose from and even more coordinating fabrics as well so they is something for everyone for sure. 


Did I mention all the great prizes as well?!? The grand prize package is valued at over $850 that includes a Janome 7330 Magnolia Sewing Machine!! There will also be a 1st place winner and 2nd place winner as well. 


For the MIM Challenge contest you can check out all the details on the Whimsical Fabrics Blog.  It runs from now till September 21st. I hope you ladies are as excited as we are about it!!! 


Hurry now and go over to the shop and start creating!! Good luck to everyone as well, I am so excited to see what everyone makes!  


Happy Sewing!!! 

Sharon